- Posted on
- • Performance
Introduction to the Yamaha RD350 and Carburetor Tuning
- Author
-
-

- User
- Torque
- Posts by this author
- Posts by this author
-

How to Finetune the Carburetor of a Yamaha RD350: A Step-by-Step Guide
The Yamaha RD350 is renowned for its agility and robust two-stroke engine. Over time, as wear and environmental conditions affect the carburetor, its performance may wane. Finetuning the carburetor restores the balance between air and fuel, which is critical for efficient combustion, smooth throttle response, and overall engine performance. Carburetor tuning is a meticulous process that involves understanding each component’s role and making precise adjustments. This guide emphasizes the importance of "settings of rd350 carburator" while diving deep into each aspect of the tuning process. We will explore not only the basic adjustments but also provide detailed specifications and part details that will help you optimize your Yamaha RD350 for maximum performance.

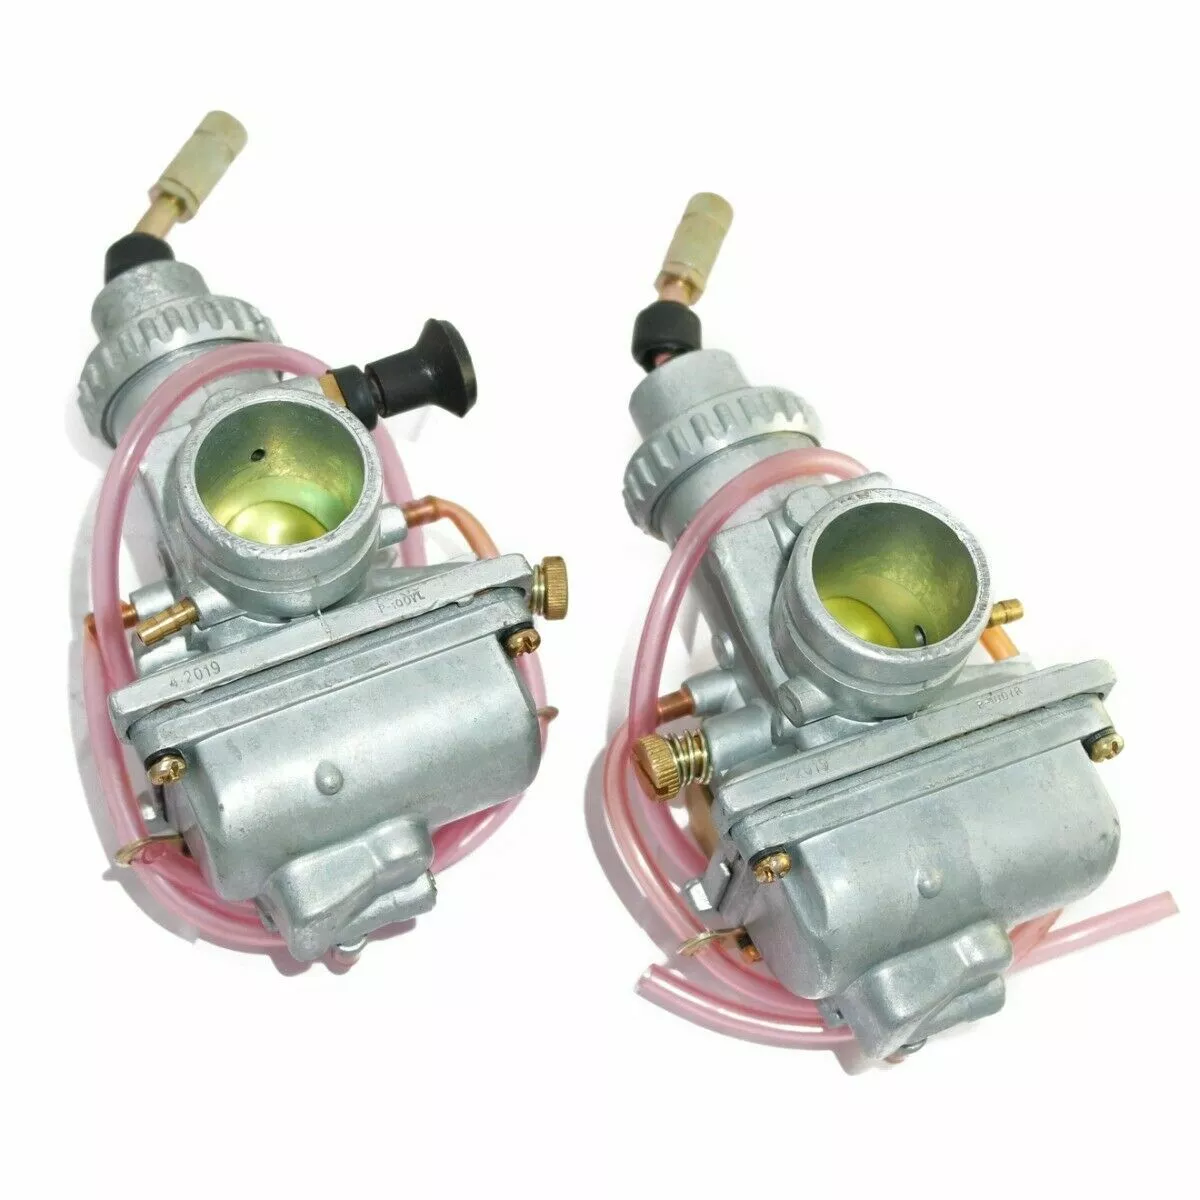
2. Understanding the Carburetor: Components and Functions Before diving into the tuning process, it’s essential to understand the main components of the RD350 carburetor and their functions:
2.1 Main Components Float Bowl & Float: The float bowl stores the fuel, and the float regulates the fuel level. A correctly calibrated float ensures a steady supply of fuel at the correct level.
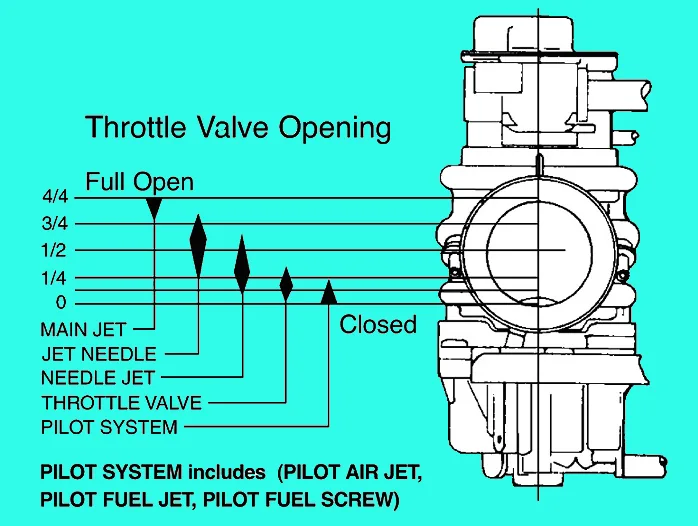
Jets (Main Jet and Pilot Jet): These are precision orifices that control the fuel flow into the carburetor. The main jet affects performance during high-throttle operation, while the pilot (or idle) jet governs low-throttle and idle conditions.
Needle and Needle Jet: The needle controls the mid-range fuel delivery. It moves with the slide to modulate the fuel mixture during throttle transitions. Its taper and clip position can significantly impact the fuel/air ratio.
Slide (Piston): The slide moves up and down to open and close the fuel passage. Its position directly affects the amount of fuel being mixed with air.
Pilot Screw (Air Screw): Adjusting this screw changes the idle mixture by controlling the amount of air bypassing the needle. It’s critical for fine-tuning idle quality and throttle response at low speeds.
Choke Mechanism: The choke enriches the mixture during cold starts by restricting air flow. It must be correctly synchronized with the throttle response.
Air Filter Assembly: While not part of the carburetor itself, the air filter’s condition greatly affects the carb’s performance. A clogged filter can lead to a richer mixture than desired.
Understanding these components is key to mastering the settings of the RD350 carburetor. Each element plays a role in achieving the ideal air/fuel ratio that will allow your engine to perform at its best.
3. Tools and Equipment Required Before beginning the tuning process, gather the following tools and equipment:
Basic Hand Tools: A set of screwdrivers, wrenches, and socket sets for disassembling the carburetor assembly.
Precision Screwdriver Set: For adjusting the pilot screw and other fine adjustments.
Carburetor Cleaner: A high-quality solvent to remove deposits from jets, needle, and other small parts.
Compressed Air: To blow out any debris or residual cleaner after washing parts.
Jet Gauges: To measure the size of the jets and compare them to the manufacturer’s specifications.
Digital Calipers: For precise measurements of the needle, jet, and other critical components.
A Service Manual: Yamaha RD350 specific service manuals provide specifications, diagrams, and adjustment procedures.
Workbench and Clean Workspace: Ensure you have a clean, well-lit area where small parts can be organized and not lost.
4. Safety Precautions and Preparation Carburetor tuning involves working with flammable fuels and small, intricate parts. Prioritize safety by following these guidelines: Work in a Well-Ventilated Area: Avoid inhaling fuel vapors or carburetor cleaner fumes.
Disconnect the Battery: For safety, disconnect the battery to prevent accidental ignition.
Wear Protective Gear: Gloves and safety glasses are recommended to protect against splashes of chemicals.
Proper Fuel Disposal: Dispose of old fuel and solvents in accordance with local hazardous waste guidelines.
Read the Manual: Familiarize yourself with the Yamaha RD350 service manual and any safety instructions provided by the tool manufacturers.
5. Step-by-Step Guide to Fine tuning the RD350 Carburetor This section provides a detailed step-by-step process to finetune the carburetor for maximum performance. The process involves inspection, cleaning, adjustment of various circuits, and final testing.
5.1 Initial Inspection and Cleaning
Step 1: Remove the Carburetor Carefully detach the carburetor from the engine following the manufacturer’s service manual. Label all connections (fuel lines, throttle cables, etc.) for easy reassembly.
Step 2: Disassemble the Carburetor Remove the float bowl, jets, needle, and slide. Take photos during disassembly for reference.
Step 3: Clean Each Component Soak parts in a carburetor cleaner solution. Use compressed air to remove debris and ensure that jets and passages are completely free of deposits. Inspect the float for damage or warping. Replace if necessary.
Step 4: Inspect Rubber Seals and Gaskets Check for cracks, wear, or hardening. Replace any that show signs of degradation to prevent vacuum leaks. By starting with a thorough cleaning and inspection, you ensure that the base components are in optimal condition for fine tuning. Neglecting this step can lead to inaccurate adjustments and suboptimal performance.
5.2 Adjusting the Pilot (Idle) Circuit
The pilot circuit controls the engine’s behavior at idle and low throttle. Incorrect settings here can lead to rough idling or stalling.
Step 1: Set the Pilot Screw Baseline With the carburetor reassembled but before full installation, adjust the pilot screw to the manufacturer’s recommended baseline. Typically, this is about 1.5 to 2 turns out from lightly seated, but always refer to the RD350 service manual for precise settings.
Step 2: Fine-Tuning at Idle Start the engine and let it reach operating temperature. Slowly adjust the pilot screw while monitoring the engine’s idle speed and smoothness. The goal is to find the sweet spot where the engine idles smoothly without hesitation or stalling. Remember, the pilot screw controls the mixture at idle, so too lean or too rich can affect low-speed performance significantly.
Step 3: Document the Settings Write down the final pilot screw setting as a reference for future tuning sessions.
5.3 Tuning the Needle and Slide Assembly
The needle and slide assembly plays a crucial role during the transition from idle to full throttle, affecting the mid-range response.
Step 1: Inspect the Needle Check the needle for wear, pitting, or erosion. Over time, a worn needle can lead to an inconsistent fuel mixture. Verify the needle’s profile against the service manual specifications. If modifications have been made in the past, consider reverting to original specifications for baseline tuning.
Step 2: Adjust the Clip Position The clip on the needle determines how far the needle travels in the jet. Changing the clip position alters the fuel mixture during mid-range operation. For a richer mixture, lower the clip (allowing more fuel); for a leaner mixture, raise it. Experiment with small adjustments and test the throttle response after each change.
Step 3: Examine the Slide and its Bore The slide should move freely without sticking. Ensure the bore of the slide is free of carbon deposits and has not been worn excessively. Check for proper alignment with the needle. Any misalignment can result in poor throttle response.
5.4 Main Jet and Air/Fuel Mixture Adjustments The main jet influences performance at higher throttle openings. Getting this setting right is essential for optimal acceleration and overall performance.
Step 1: Remove and Inspect the Main Jet Remove the main jet and compare its orifice size to the standard specifications. Over time, deposits may have partially blocked the jet, leading to a lean condition.
Step 2: Clean or Replace the Main Jet If cleaning does not restore the proper orifice diameter, replace the jet with one that meets the RD350 specifications.
Step 3: Adjust the Air/Fuel Mixture Reassemble the carburetor and start the engine. Gradually increase throttle to observe engine response and acceleration. A lean mixture may lead to hesitation and reduced performance, while an overly rich mixture can cause fouling of the spark plug and loss of power. Use a combination of spark plug readings and engine performance data (such as exhaust color and response during acceleration) to fine-tune the mixture.
Step 4: Monitor High RPM Performance After adjusting the main jet, test the engine under full load conditions. Listen for any signs of backfiring or unusual noises which might indicate an incorrect mixture.
5.5 Testing and Final Adjustments After completing the primary adjustments, it’s time to test the carburetor settings under real-world conditions.
Step 1: Reinstall the Carburetor Carefully reinstall the carburetor on the engine, ensuring all linkages and hoses are reconnected properly.
Step 2: Road Testing Take the RD350 for a test ride. Monitor the engine’s response at various speeds and throttle positions. Pay close attention to how the bike idles, accelerates from a stop, and responds to sudden throttle openings. Make further adjustments to the pilot screw, needle clip position, or main jet as necessary.
Step 3: Use Diagnostic Tools If available, use diagnostic tools such as an exhaust gas analyzer or performance meter. These tools can provide real-time data on the air/fuel ratio, helping you fine-tune the settings of the RD350 carburator with precision.
Step 4: Record Final Settings Once the engine operates smoothly and efficiently across all conditions, document all final settings. This record is invaluable for future maintenance and adjustments.
6. Detailed Carburetor Parts Specifications and Data For those who demand every detail, here are the typical specifications and data related to the Yamaha RD350 carburetor:
6.1 Float Bowl and Float Assembly
Float Type: Typically a needle-and-seat type with adjustable float height. Float Level Specification: The fuel level should be set as per the manufacturer’s manual – usually around 28-30mm from the bowl base.
Seal Material: Rubber or silicone seals that must be intact and free of cracks.
6.2 Jet Specifications
Main Jet Orifice: Commonly sized to deliver the optimum fuel flow at full throttle. Standard RD350 main jets range around 120-130 (number may vary by region and model year).
Pilot Jet: Controls idle fuel delivery; precise sizing is crucial. Often, pilot jets for RD350 are set to allow a balanced idle speed – check the service manual for exact numbers.
6.3 Needle and Slide Assembly
Needle Profile: The needle typically has a tapered profile, calibrated for mid-range performance.
Clip Position: Adjustments usually allow a variation of 1-2 notches. Lowering the clip increases the fuel delivery in the mid-range.
Slide Bore Diameter: Must be free of wear. Typically, the bore diameter is designed to match the needle’s taper and ensure smooth fuel metering.
6.4 Pilot Screw (Air Screw)
Initial Setting: Generally, the air screw is set to 1.5 to 2 turns out from light seating. Fine adjustments can be made from this baseline.
Adjustment Range: Small adjustments (1/8 turn increments) can have a noticeable effect on the idle mixture.
6.5 Additional Components
Choke Operation: The choke plate should be verified for smooth operation, ensuring it fully enriches the mixture during cold starts and disengages correctly once the engine warms up.
Air Filter Compatibility: Ensure the air filter is of the correct type and is in good condition. A high-flow air filter may be used to further optimize performance, though it might require additional tuning of the carburetor. These specifications provide a technical backbone to your tuning efforts. Cross-reference these values with your RD350’s service manual to ensure that each component is within the recommended parameters for maximum performance.
7. Troubleshooting Common Issues
Even with careful tuning, you might encounter issues along the way. Here are some common problems and potential solutions:
7.1 Rough Idle or Stalling
Cause The pilot screw setting may be off, or there could be an air leak due to a worn gasket.
Solution: Recheck the pilot screw adjustment and inspect all seals for damage. Replace any worn gaskets.
7.2 Poor Throttle Response
Cause The needle may be worn or set at an incorrect clip position.
Solution: Inspect the needle for wear, and adjust the clip position incrementally. Ensure the slide moves freely without obstruction.
7.3 Over-Rich or Over-Lean Mixture
Cause Main jet size or pilot jet settings might be off.
Solution: Reassess the jet sizes using a jet gauge. If the engine runs too rich (black smoke, fouled spark plugs), consider a smaller main jet. Conversely, if the engine runs too lean (hesitation, backfiring), a larger jet may be required.
7.4 Vapor Lock or Fuel Delivery Issues
Cause Old fuel or clogged fuel lines can restrict flow.
Solution: Drain old fuel, clean the fuel lines, and ensure the carburetor float is functioning properly. Clean the fuel filter if applicable.
7.5 Choke and Cold Start Problems
Cause The choke may not be engaging fully due to mechanical wear.
Solution: Inspect the choke linkage and mechanism. Replace worn components to ensure proper cold-start enrichment. These troubleshooting tips can help you diagnose and resolve issues quickly, ensuring that your RD350 continues to perform at its best.
8. Maintenance Tips for Long-Lasting Performance Once your carburetor is finely tuned, regular maintenance is essential to preserve its performance over time. Here are some best practices:
Regular Cleaning: Clean the carburetor every 5,000 miles or at the start of each riding season. Removing buildup of deposits prevents performance degradation.
Fuel Quality: Use high-quality fuel and consider fuel stabilizers if the bike is stored for extended periods. Poor quality fuel can leave residues that clog jets and passages.
Periodic Inspections: Regularly inspect the float, needle, jets, and seals. Early detection of wear or damage can prevent more severe issues later on.
Check the Air Filter: Replace or clean the air filter as recommended. A clean air filter is critical to maintaining the correct air/fuel ratio.
Document Settings: Keep a log of your carburetor settings and adjustments. This log is invaluable if you need to revert to previous settings or compare performance after changes.
Synchronize with Other Components: Remember that the carburetor is only one part of the engine. Ensure that the ignition system, exhaust, and other components are also in optimal condition to achieve the best performance.
Following these maintenance tips will help you keep the "settings of rd350 carburator" consistent, ensuring that your Yamaha RD350 remains responsive, efficient, and enjoyable to ride for years to come.
9. Conclusion Finetuning the carburetor on your Yamaha RD350 is both an art and a science. By understanding each component—from the float bowl and jets to the needle, slide, and pilot screw—you can make informed adjustments that restore and even enhance your engine's performance. This comprehensive guide has walked you through the necessary steps:
Initial Inspection and Cleaning: Ensuring that all parts are free of deposits and functioning correctly. Adjusting the Idle Circuit: Fine-tuning the pilot screw for a smooth, stable idle.
Tuning the Needle and Slide Assembly: Optimizing mid-range performance by adjusting the needle clip position. Main Jet and Mixture Adjustments: Balancing the high-throttle performance through proper jet sizing.
Final Testing and Troubleshooting: Road testing and making incremental adjustments to achieve the perfect air/fuel ratio.
By meticulously following these steps and referring to the detailed parts specifications and data provided, you can achieve the optimum "settings of rd350 carburator" that not only meet the factory specifications but also suit your riding style and environmental conditions. Remember that carburetor tuning is a dynamic process—factors such as altitude, temperature, and fuel quality can influence your settings. Thus, periodic adjustments and regular maintenance are crucial.
This tutorial has been designed to serve as an in-depth resource for anyone looking to get the most out of their Yamaha RD350. Whether you’re restoring a vintage model or fine-tuning a daily ride, the principles outlined here will help you unlock the full potential of your motorcycle’s engine.
In summary, with patience, precision, and the right tools, you can transform your Yamaha RD350 into a machine that runs smoother, responds faster, and performs at peak efficiency. Happy tuning, and enjoy the ride!
By following the steps in this guide, you are well on your way to achieving an optimally tuned carburetor that supports maximum engine performance and longevity. Remember, every adjustment is a learning opportunity—document your changes, monitor performance, and don’t be afraid to experiment within the safe parameters provided by your service manual. With the right settings of the RD350 carburator, your legendary motorcycle will continue to deliver the performance that has made it an icon in the world of two-stroke bikes.
